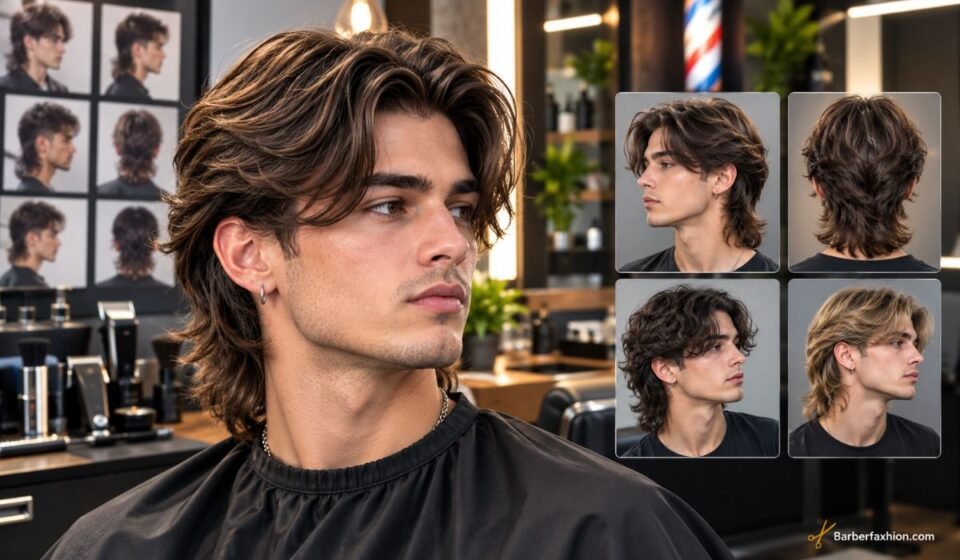

A mullet already has plenty of personality, but adding a middle part gives it a completely different feel. Instead of simply pushing the front forward or back, the hair splits from the center and frames both sides of the face while the longer back keeps that unmistakable mullet shape.
If you’re searching for a mid part mullet, you’re probably looking for more than haircut photos. You want to know which version works with your hair, whether you should choose a fade or no fade, how long your hair needs to be, and what to tell your barber. This guide covers 20+ modern styles, plus hair-type advice, face-shape tips, styling steps, products, and maintenance.
Quick Answer: A middle part mullet combines a center-parted front with shorter, tapered, faded, or natural sides and a longer back. It can work with straight, wavy, curly, thick, or fine hair when the length and layering are adjusted to suit the hair’s natural texture.
What Is a Mid Part Mullet?
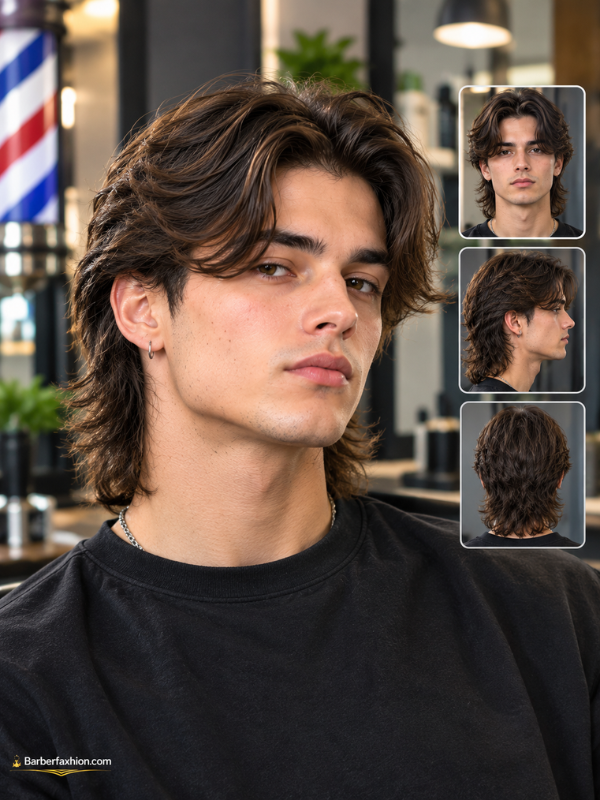
A middle part mullet combines two recognizable haircut features: a center part in the front and the longer-back shape of a mullet. The hair around the forehead is divided from the middle and usually falls toward both sides, creating a curtain-like frame around the face.
The sides can be natural, tapered, or faded depending on how clean or dramatic you want the haircut to look. Meanwhile, the back usually stays longer and layered rather than ending at the same length as the sides.
The result can range from soft and relaxed to sharp and edgy. That’s why the haircut works across several aesthetics instead of having one fixed appearance.
Middle Part Mullet vs Traditional Mullet
A traditional mullet often focuses heavily on the contrast between shorter hair around the front and sides and longer hair in the back. The front may be brushed forward, spiked, textured, or styled casually.
A middle part changes that balance. Instead of hiding the forehead with forward-facing hair, the front opens around the center and creates two sections that frame the face.
This makes the haircut feel more intentional around the face while keeping the length and movement at the back.
Middle Part Mullet vs Curtain Haircut
A curtain haircut and a middle-part mullet can look similar from the front, especially when both have longer hair around the forehead. The main difference is the silhouette from the sides and back.
Curtain hair usually maintains a relatively consistent overall length. A mullet has a more obvious transition into longer back sections.
If you like curtain bangs but want more texture and length toward the nape, the mullet version can give you that extra edge.
How Long Does Your Hair Need to Be?
There’s no single required length, but enough front and top length is important if you want the middle part to fall naturally.
Short hair can create a subtle center part, while medium-length hair gives the front more movement. Longer hair creates a stronger curtain effect and makes the contrast with the back more noticeable.
If your hair is currently short, don’t assume you need to grow everything equally. Your barber can shape the sides and back while you gradually build enough length for the front to separate naturally.
20+ Best Middle Part Mullet Styles
There isn’t just one way to wear this haircut. Your hair texture, length, face shape, and preferred level of maintenance can completely change the final result.
Here are 21 variations worth considering.
1. Classic Middle Part Mullet
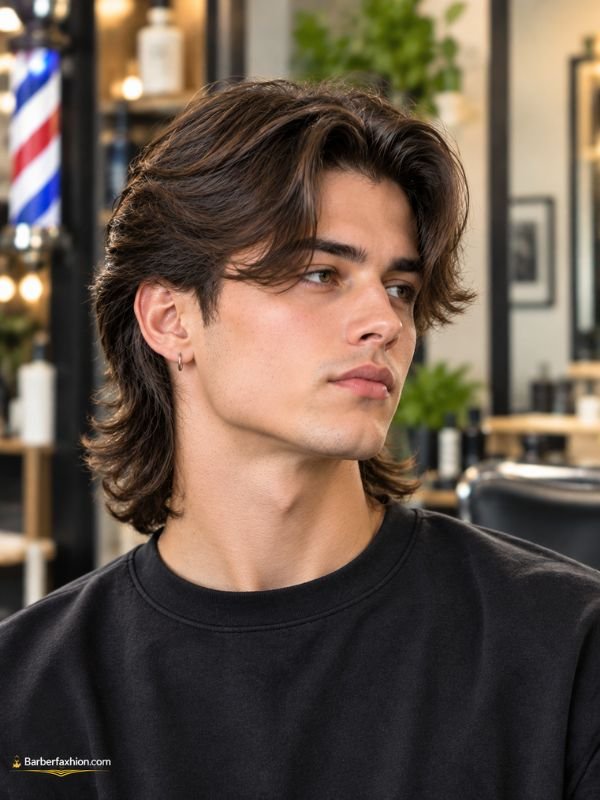
The classic version keeps the center part clear while maintaining moderate length through the back. The sides are usually controlled without creating an extremely high contrast.
This is a good starting point if you’re interested in the style but don’t want an overly dramatic haircut. Keep the layers soft and let your natural texture do some of the work.
2. Short Middle Part Mullet
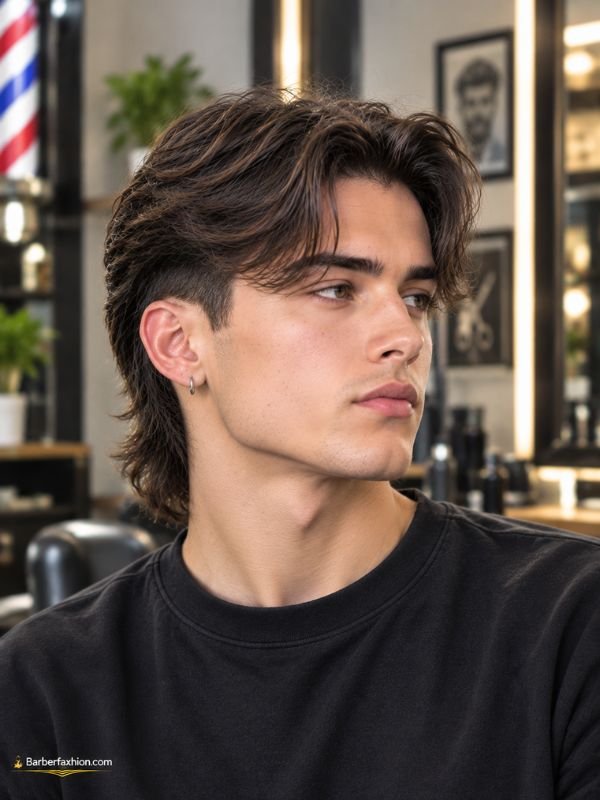
A short version keeps the overall silhouette compact while still allowing the front to separate down the middle. The back doesn’t need to reach the shoulders to create a recognizable mullet shape.
This option works particularly well for someone who wants the haircut’s attitude without committing to a long grow-out. A low taper around the sides can make it even cleaner.
3. Long Middle Part Mullet
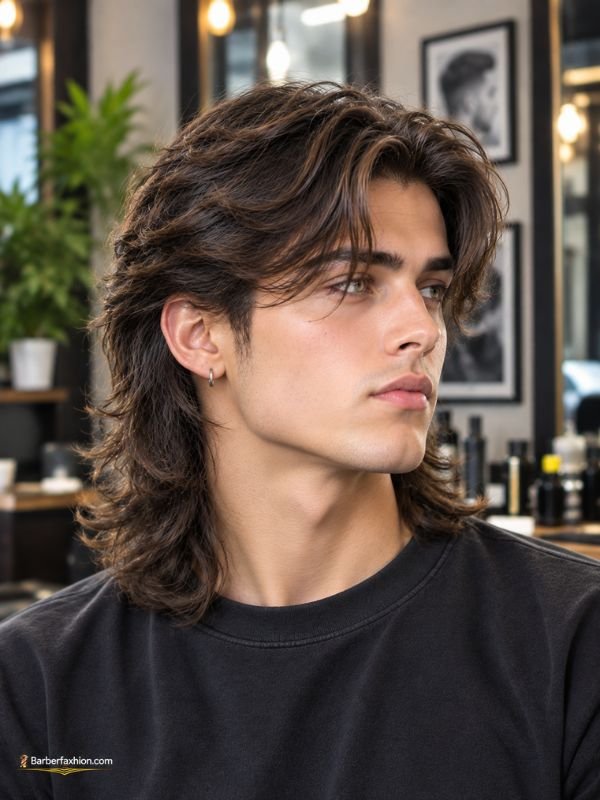
A long version creates a stronger contrast between the front, sides, and back. The longer rear sections can move around the neck and shoulders, giving the haircut a flowing appearance.
This works especially well with naturally wavy hair because the longer layers can develop movement without requiring heavy styling.
If your hair is straight, adding layers can stop the back from looking too flat or heavy.
4. Modern Middle Part Mullet
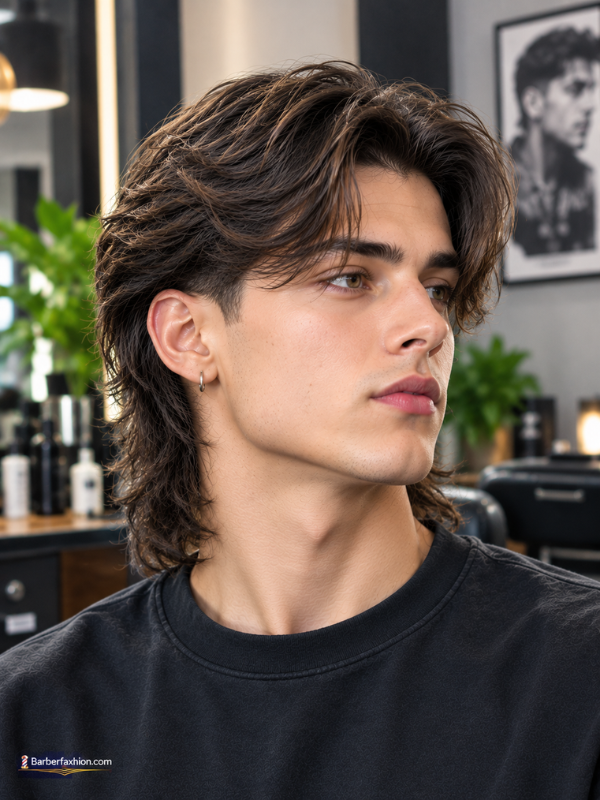
A modern version usually has cleaner proportions and more controlled layering than a deliberately retro mullet. The middle part frames the face while the sides can be tapered or lightly faded.
The key is balance. You don’t need an extremely long back or dramatically shaved sides to make the haircut look current.
A textured finish through the crown can also make the transition between the top and back feel more natural.
5. Middle Part Mullet for Straight Hair
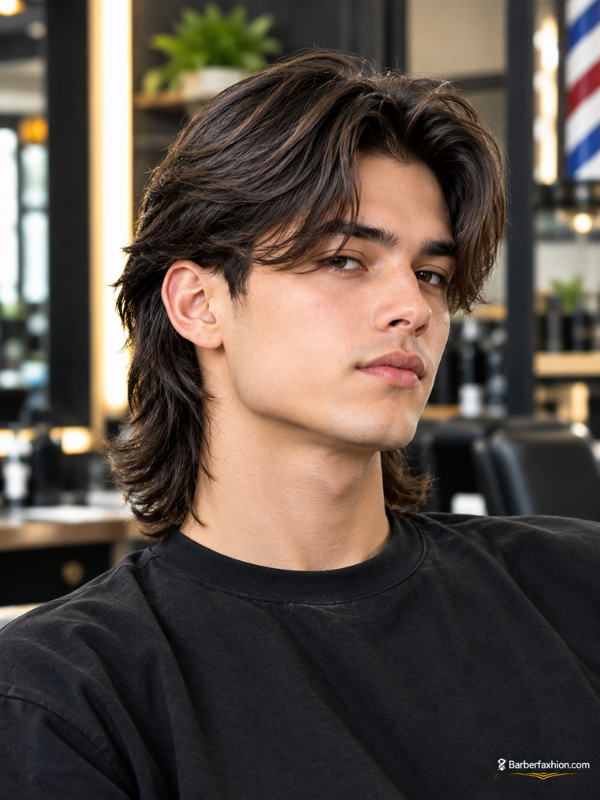
Straight hair makes the center part easy to see, which gives this style a clean and defined appearance. The downside is that straight hair can sometimes fall flat if there isn’t enough layering.
Ask for light texture through the top and back rather than removing too much weight. A blow dryer and lightweight styling product can then create movement without making the hair stiff.
For a sharper finish, keep the center part relatively clean. For a relaxed look, allow a few pieces to fall naturally around the forehead.
6. Middle Part Mullet for Wavy Hair
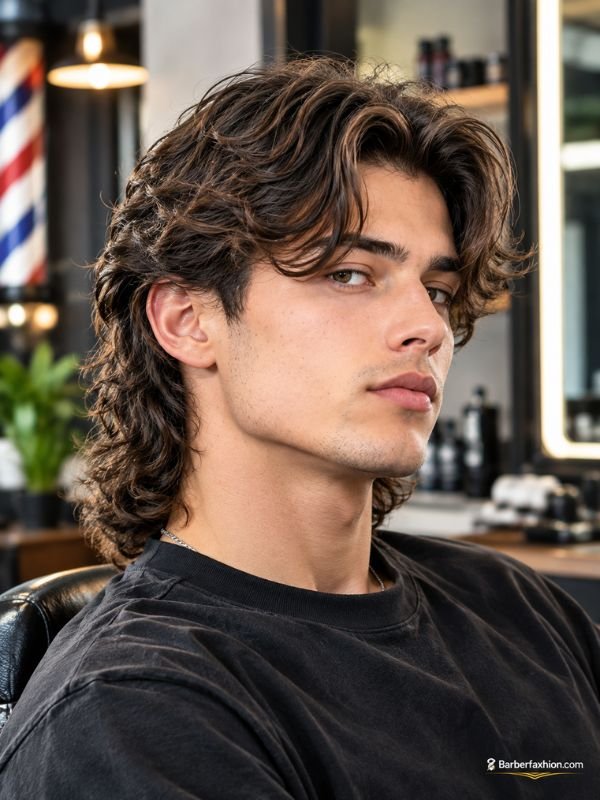
Wavy hair gives the haircut natural movement, so you don’t need to force every section into place. The middle part can create two loose front sections while the waves continue through the crown and back.
Ask your barber to preserve enough length to let the wave pattern develop. Over-layering can sometimes make thick waves expand too much.
A small amount of styling cream or sea-salt spray can enhance the texture without making it look overly polished.
7. Curly Middle Part Mullet
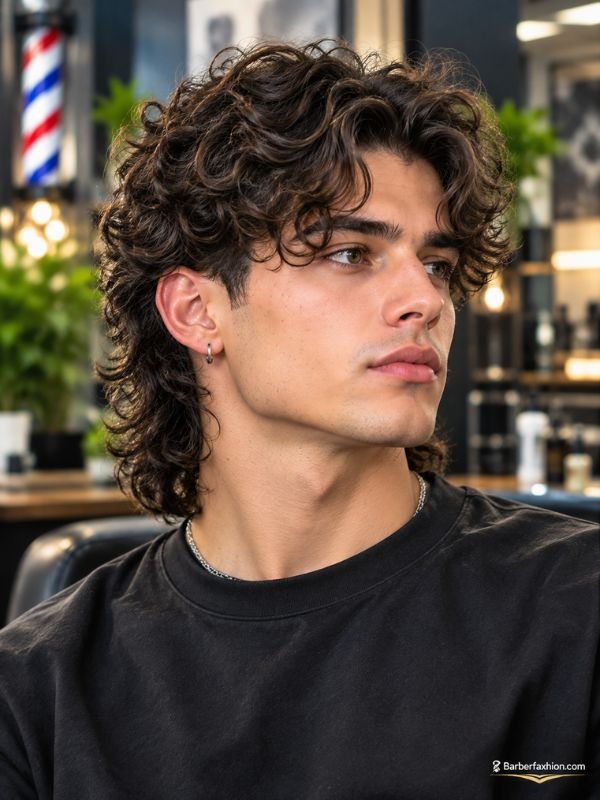
Curly hair can turn a middle-part mullet into a much more voluminous style. The curls create separation through the front while the longer back develops a rounded, textured shape.
The most important part is working with the curl pattern instead of cutting everything as though the hair were straight. Your barber should consider how much the curls shrink when dry.
A curl cream can help define the front sections while keeping the back soft and controlled.
8. Korean Middle Part Mullet
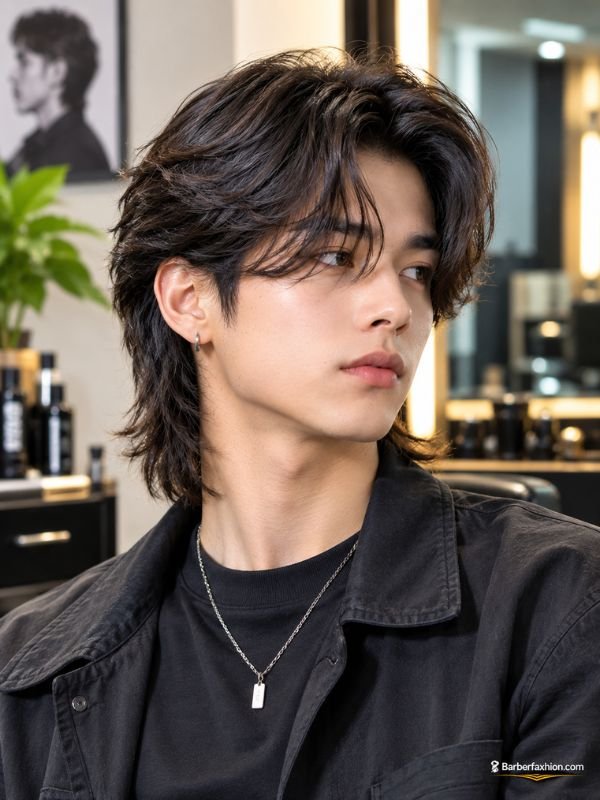
The Korean-inspired version usually has a softer front, visible center part, flowing layers, and controlled movement rather than extremely aggressive contrast.
The front sections can fall around the cheekbones or jaw depending on the length. The back is usually layered so it moves rather than simply hanging straight down.
This variation is particularly suitable if you want a middle-part haircut that feels stylish and polished without looking overly rugged.
9. Shaggy Middle Part Mullet
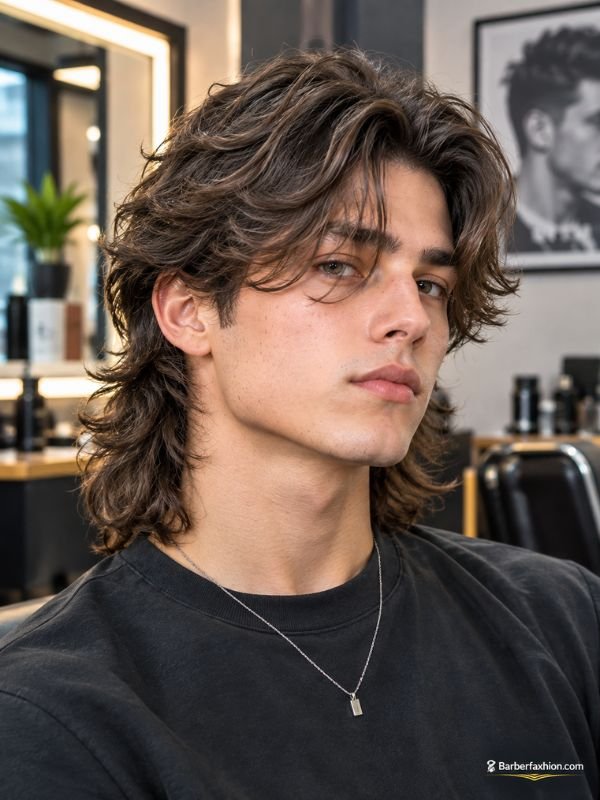
The shaggy version intentionally embraces uneven-looking texture and loose layers. The center part remains visible, but the surrounding hair isn’t supposed to look perfectly controlled.
It works especially well with wavy or naturally textured hair. Straight hair can also pull it off with the help of a texturizing product.
The goal is movement rather than precision.
10. Textured Middle Part Mullet
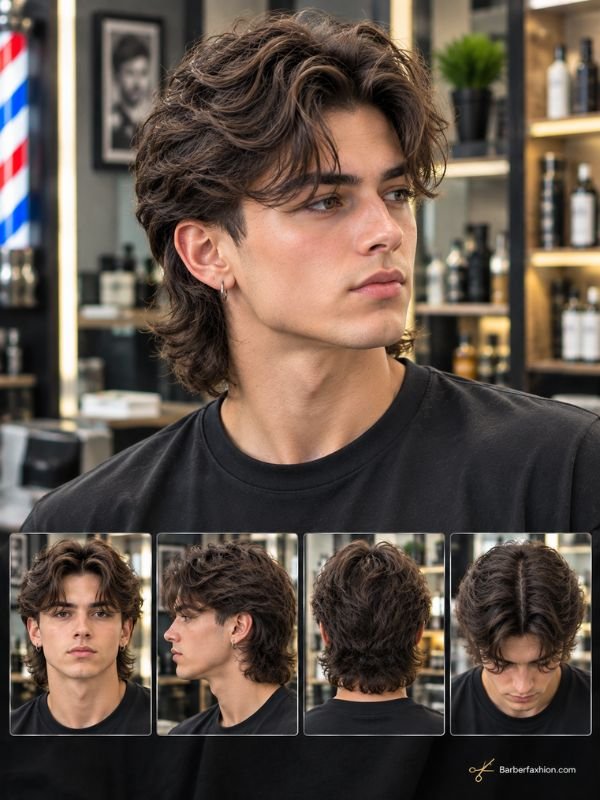
A textured version uses layers and separated ends to create more dimension. Instead of allowing the hair to fall as one heavy shape, the cut creates visible movement through the top and back.
This can be useful for medium-density hair that needs more visual depth. Matte styling products are usually better than heavy gels when you want the texture to remain flexible.
11. Middle Part Taper Mullet
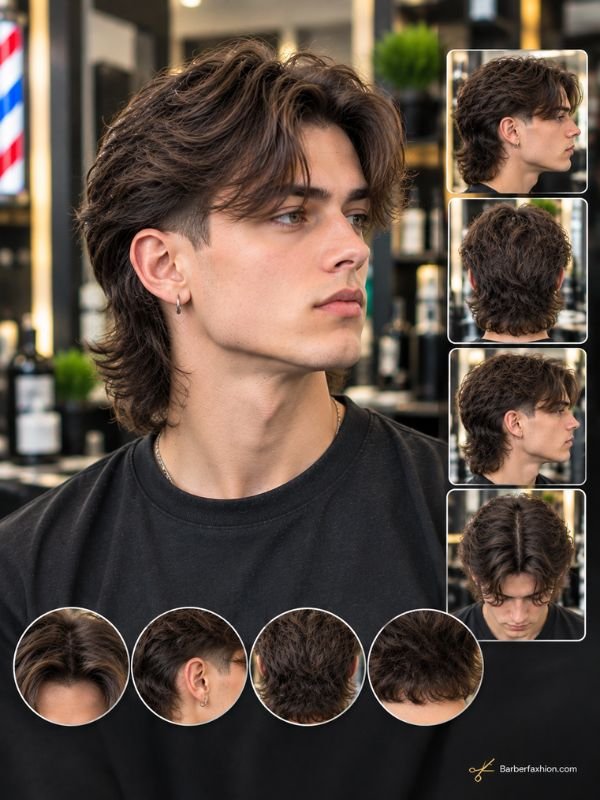
A taper keeps the sides and neckline cleaner without producing the dramatic contrast of a skin fade. The center-parted top and longer back remain the main features.
It’s a practical option if you want something modern but still relatively wearable for everyday situations.
You can ask your barber for a subtle taper around the sideburns and neckline while keeping more weight around the upper sides.
12. Middle Part Fade Mullet
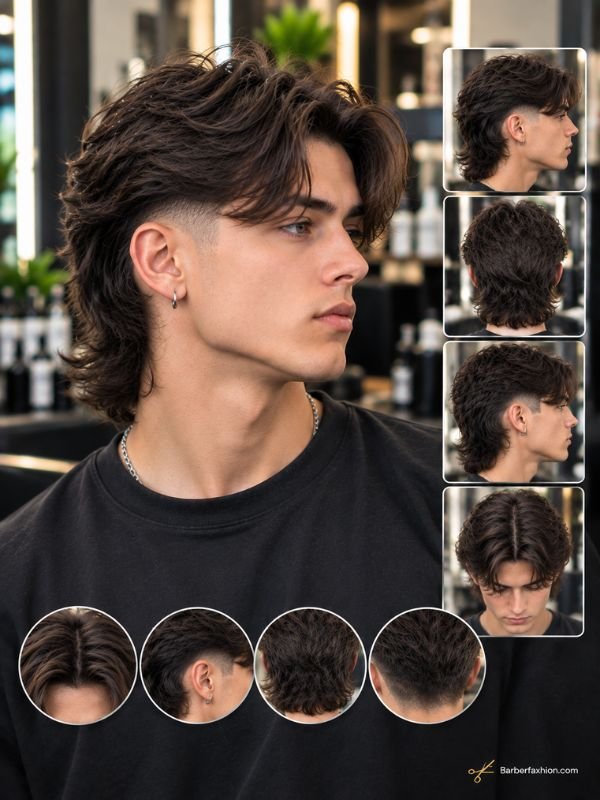
A fade creates more contrast between the longer top and back and the shorter sides. Depending on the fade height, the final haircut can range from subtle to bold.
A low fade keeps the contrast closer to the lower sides. A higher fade creates a more noticeable transition.
Because the fade changes the silhouette significantly, it’s worth deciding how dramatic you want the haircut to look before the clippers come out.
13. Middle Part Drop Fade Mullet
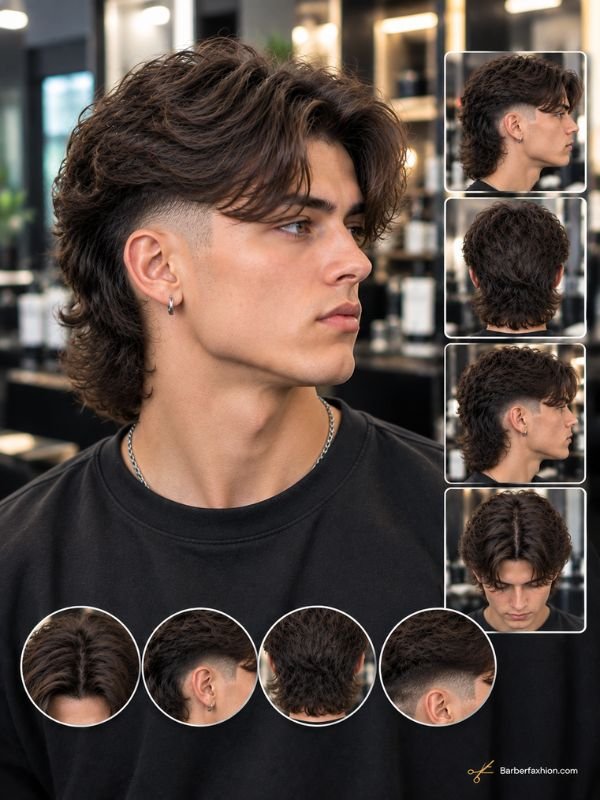
A drop fade follows the natural curve around the head and drops lower toward the back. This can create a clean transition while leaving enough visual length above the neckline.
The combination of a center-parted top, faded sides, and longer back creates a strong modern silhouette.
This is a good choice when you want the sides noticeably cleaner without completely disconnecting the top from the back.
14. V-Back Middle Part Mullet
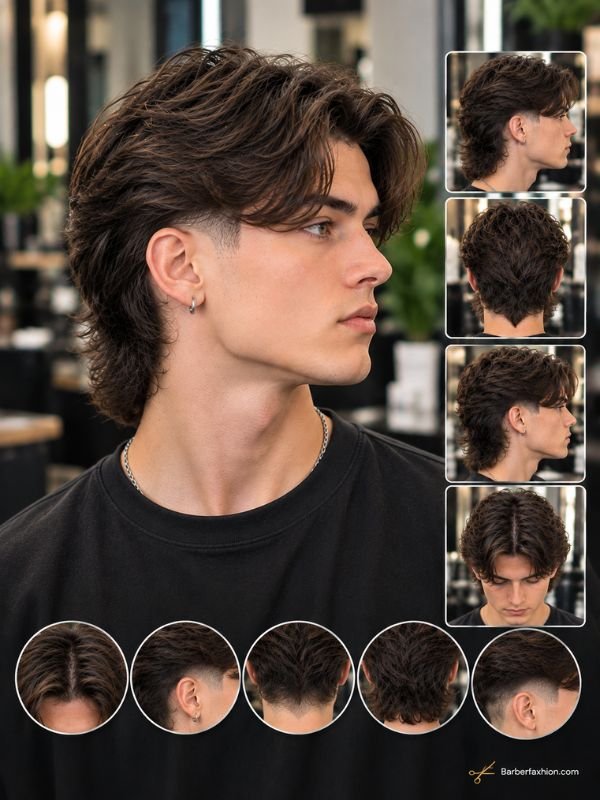
The V-back version shapes the longer rear section into a subtle point rather than keeping the bottom completely straight.
This detail can make the back look more deliberate, particularly when viewed from behind. It works with both shorter and longer mullet lengths.
Keep the V subtle if you want an everyday haircut. A deeper point creates a more dramatic result.
15. Messy Middle Part Mullet
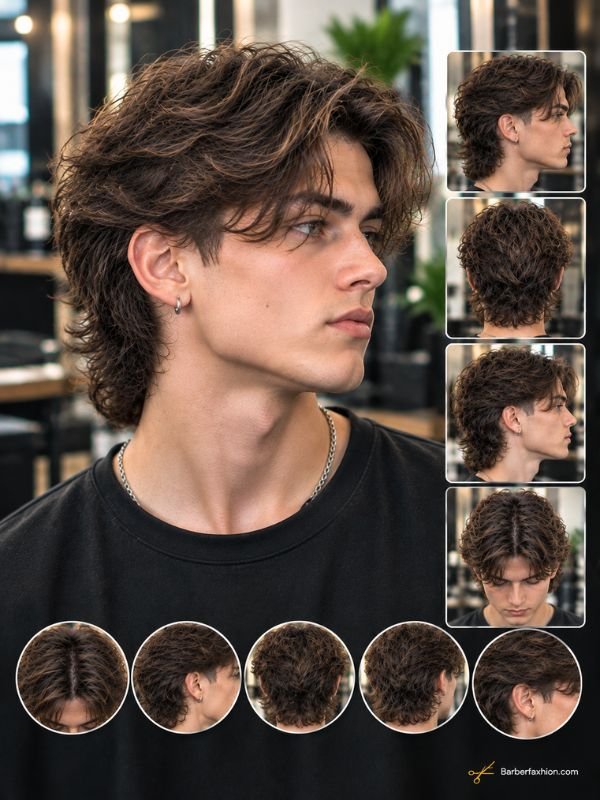
The messy version is designed to look effortless rather than freshly combed. The center part remains recognizable, but the front sections can separate unevenly.
Texture is the main ingredient here. A small amount of matte paste or texturizing spray can create separation without making every strand look fixed.
This is especially easy to maintain if your hair already has natural waves.
16. Fluffy Middle Part Mullet
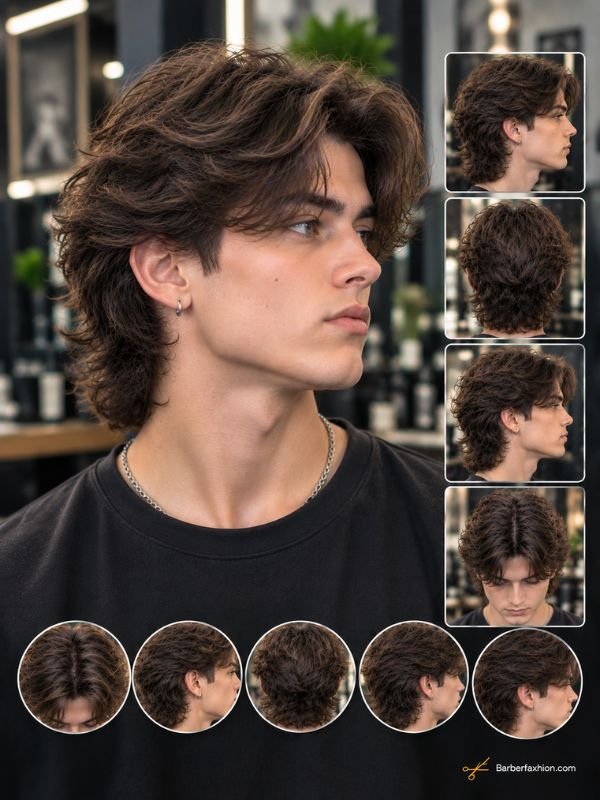
A fluffy style focuses on volume around the top and front. Instead of pressing the hair close to the head, you allow the center-parted sections to lift slightly before falling outward.
This works particularly well with medium-density straight or wavy hair. Blow-drying the roots away from the scalp can create the necessary lift.
Avoid heavy products that flatten the hair after styling.
17. Layered Middle Part Mullet
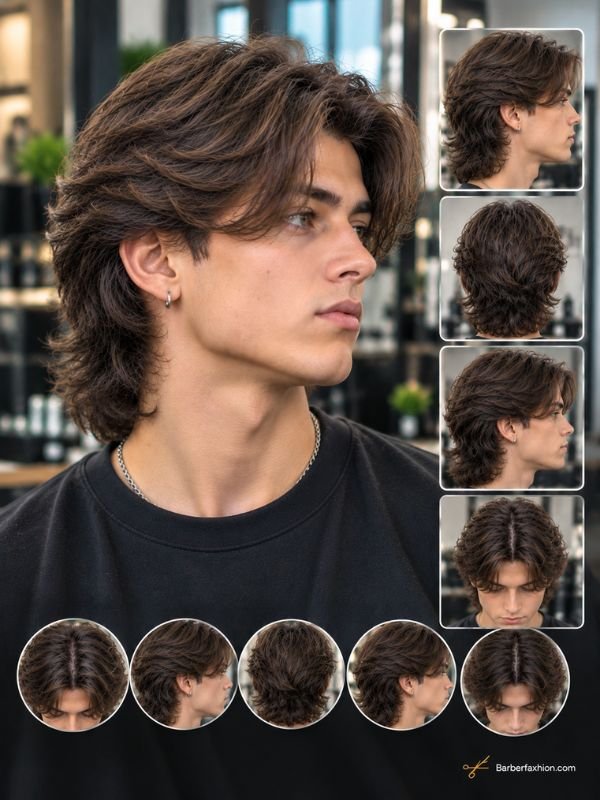
Layers are one of the easiest ways to give this haircut movement. Shorter layers near the crown can gradually connect to longer sections toward the back.
The exact layering should depend on your hair density. Thick hair may need weight removed strategically, while fine hair usually benefits from keeping enough density at the ends.
A good layered cut should move naturally rather than looking chopped into separate sections.
18. Middle Part Mullet With Beard
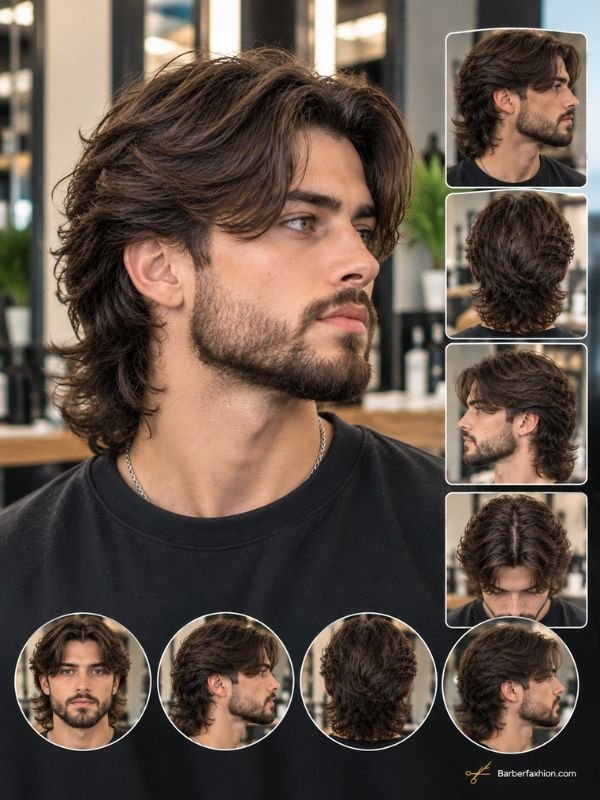
Adding facial hair changes the overall balance of the haircut. A beard can make the style feel more rugged, while short stubble keeps the appearance lighter.
You don’t need an extremely long beard to make the combination work. Even neat stubble can complement the longer back.
Consider keeping the beard shape relatively clean if the haircut already has plenty of texture.
19. Middle Part Mullet With Fringe
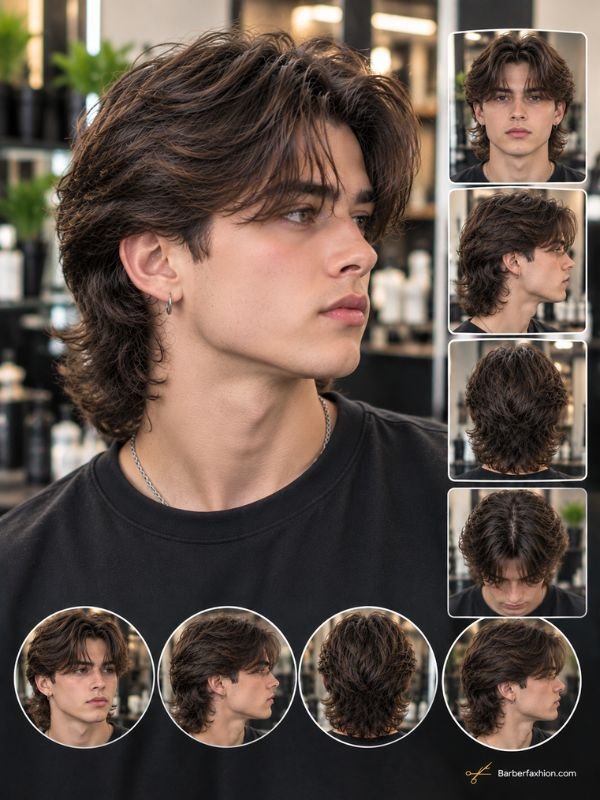
Although the center part is the defining feature, a fringe can be incorporated into a softer or more textured version.
The front sections may not separate perfectly down the center. Instead, shorter pieces can blend into longer curtain-like sections.
This is useful if you want some forehead coverage while retaining the general shape of a middle-part haircut.
20. Middle Part Mullet for Thick Hair
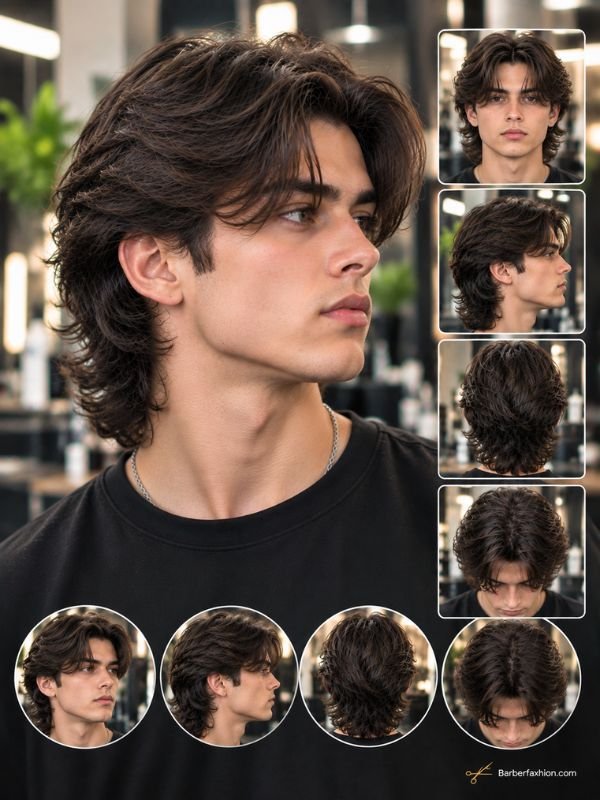
Thick hair gives you plenty of volume, but too much weight can make the haircut look bulky. Strategic layering can remove unnecessary heaviness while preserving the shape.
Don’t ask your barber to simply thin everything out. Removing too much density can make the ends look weak or cause thick hair to behave unpredictably as it grows.
Focus on controlled weight removal through the areas that feel heavy.
21. Middle Part Mullet for Fine Hair
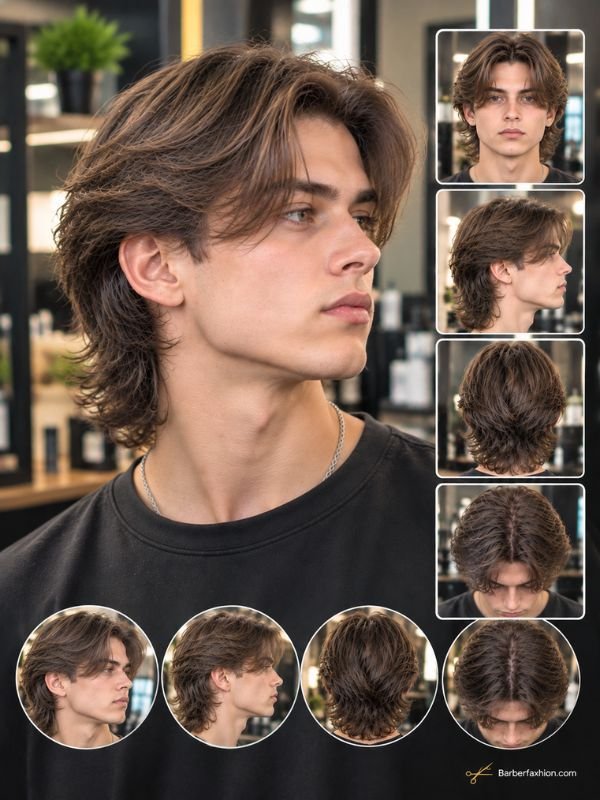
Fine hair can still work with this haircut, but the approach should be different. Excessive thinning can make fine hair look even flatter.
Keeping enough length and using light layers can help maintain the appearance of fullness. Texture at the ends can also make the haircut look more dimensional.
A lightweight volumizing mousse or texture spray can give the roots some lift without creating a greasy finish.
Middle Part Mullet With or Without a Fade
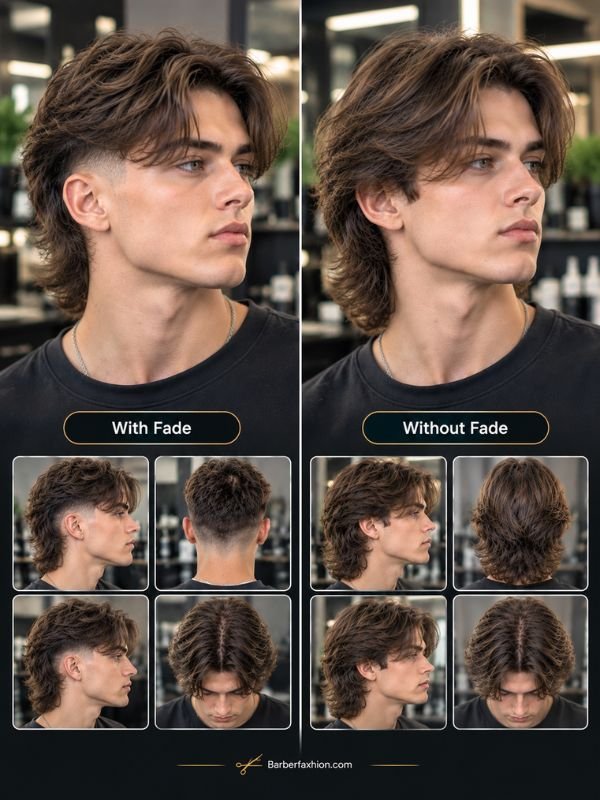
The sides have a major influence on how the entire haircut looks. Choosing between a fade and no fade isn’t simply a technical decision; it changes the personality of the style.
Middle Part Mullet With a Fade
A fade gives the sides a cleaner and more defined appearance. It can make the longer back look more noticeable because of the contrast.
Low fades are generally more subtle, while higher fades create stronger separation.
If you’re getting your first mullet, showing your barber a photo of the exact fade height can prevent misunderstandings.
Middle Part Mullet Without a Fade
A no-fade version keeps more natural weight around the sides. This gives the haircut a softer and more connected appearance.
It’s particularly useful if you want a retro, shaggy, or relaxed look. The sides can still be cleaned around the ears and neckline without turning them into a skin fade.
This version can also be easier to grow out because there isn’t a sharp fade line to maintain.
Middle Part Taper vs Fade
A taper gradually cleans the hair around specific areas such as the sideburns and neckline. A fade generally creates a more noticeable reduction in length across the sides.
Choose a taper if you want the haircut to retain more weight. Choose a fade if you prefer stronger contrast.
Neither option has to define the entire haircut. Your barber can adjust the transition according to the amount of contrast you want.
How to Choose the Right Middle Part Mullet for Your Hair
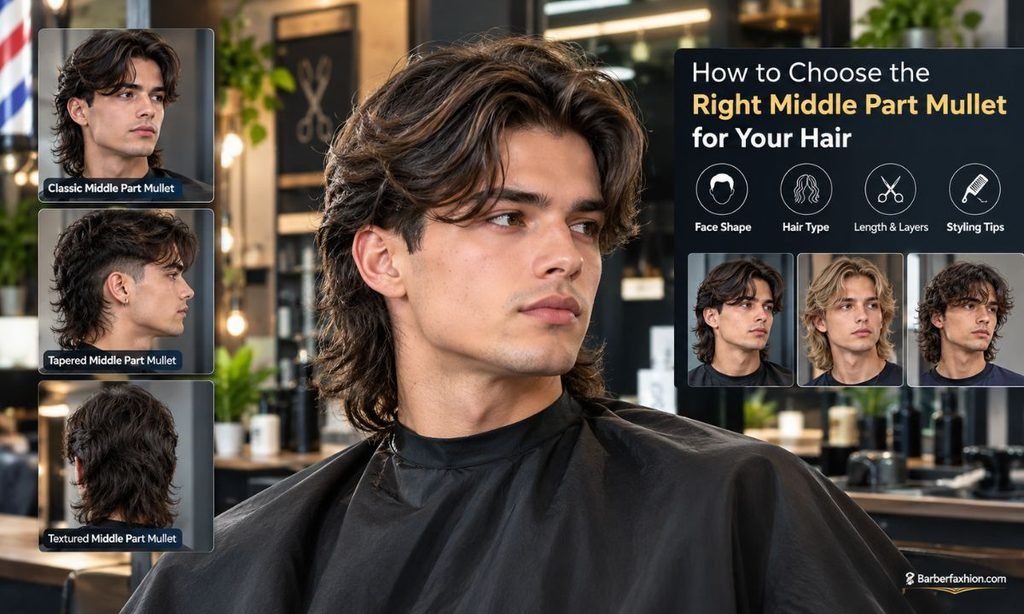
Your hair’s natural behavior matters more than the name of the haircut. The same cut can look completely different on straight and curly hair.
| Hair Type | What to Consider | Suitable Finish |
| Straight | Add layers and texture | Clean or messy |
| Wavy | Preserve natural movement | Relaxed |
| Curly | Allow for shrinkage | Voluminous |
| Thick | Remove weight strategically | Controlled |
| Fine | Preserve density | Light and textured |
Straight Hair
Straight hair makes the center part easy to define, but it may need styling for volume. Layers can prevent the back from appearing like one solid block of hair.
Wavy Hair
Wavy hair naturally creates the movement that makes the haircut look relaxed. Use products that enhance the wave instead of forcing it straight.
Curly Hair
Curly hair requires attention to shrinkage and curl direction. Keep enough length for the curls to form properly, particularly around the back.
Thick Hair
Thick hair benefits from controlled layering. The goal is to reduce unnecessary weight without destroying the fullness that gives the haircut its shape.
Fine or Thin Hair
Fine hair usually needs a lighter touch with thinning shears. Focus on volume, texture, and maintaining enough density through the top and back.
Which Face Shape Works With a Middle Part Mullet?
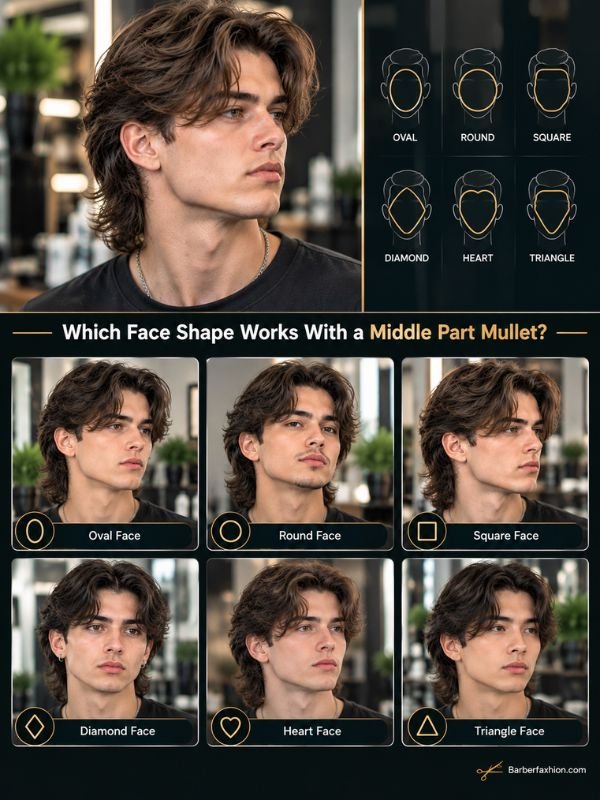
The haircut can be adjusted for different face shapes. Instead of choosing a style based only on a face-shape label, look at where the front sections fall and where the haircut creates volume.
| Face Shape | Helpful Approach |
| Oval | Experiment with different lengths and textures |
| Round | Add controlled height and avoid excess side width |
| Square | Use softer layers and movement |
| Oblong | Keep top height moderate |
| Heart | Balance the forehead and lower face |
| Diamond | Use soft framing around the cheekbones |
Oval Face
An oval face offers plenty of flexibility. You can experiment with shorter, longer, faded, or shaggy variations.
The main decision is your preferred aesthetic rather than trying to correct a specific facial proportion.
Round Face
If your face is rounder, adding some height through the top can create a longer visual silhouette.
Avoid making the sides excessively wide if you want a more streamlined appearance.
Square Face
A square face already has strong angles around the jaw. Softer layers and movement around the front can create a less rigid appearance.
A textured or wavy variation can work particularly well if you prefer a relaxed finish.
Oblong Face
For an oblong face, excessive height on top can visually lengthen the face further. A balanced middle part with controlled volume can help keep the overall shape proportional.
Longer side sections can also provide more visual width.
Heart-Shaped Face
A heart-shaped face can benefit from balanced framing around the forehead and cheek area. Avoid making the upper section dramatically wider than the lower part of the face.
Soft curtain-like sections can create a natural transition.
Diamond Face
Diamond-shaped faces often have more noticeable cheekbone width. A layered front can help frame those areas without adding unnecessary bulk.
Wavy or textured variations can soften the overall outline.
How to Choose the Right Style
Choosing a variation comes down to more than whether a picture looks good. Think about your current length, natural texture, styling habits, and how much maintenance you’re comfortable with.
Choose Based on Hair Length
Short hair works for compact versions, while medium and long hair offer more freedom with the front and back.
If you want the classic flowing curtain effect, give the front enough time to grow before expecting it to fall naturally.
Choose Based on Hair Texture
Straight hair can create a cleaner center part. Wavy hair adds natural movement, while curly hair produces more volume and definition.
Your natural texture should guide the layering rather than being treated as something you need to fight.
Choose Based on Your Desired Vibe
For a clean appearance, consider a taper or subtle fade. For something relaxed, choose a shaggy or wavy variation.
If you want a stronger alternative look, a drop fade, V-back, or heavily textured version can create more contrast.
Taper, Fade or Natural Sides?
Think about the amount of maintenance you’re comfortable with.
A fade usually needs more frequent cleanup to keep the sides sharp. A taper offers a cleaner appearance while allowing more natural growth. No fade gives you the most relaxed silhouette.
How to Style a Middle Part Mullet
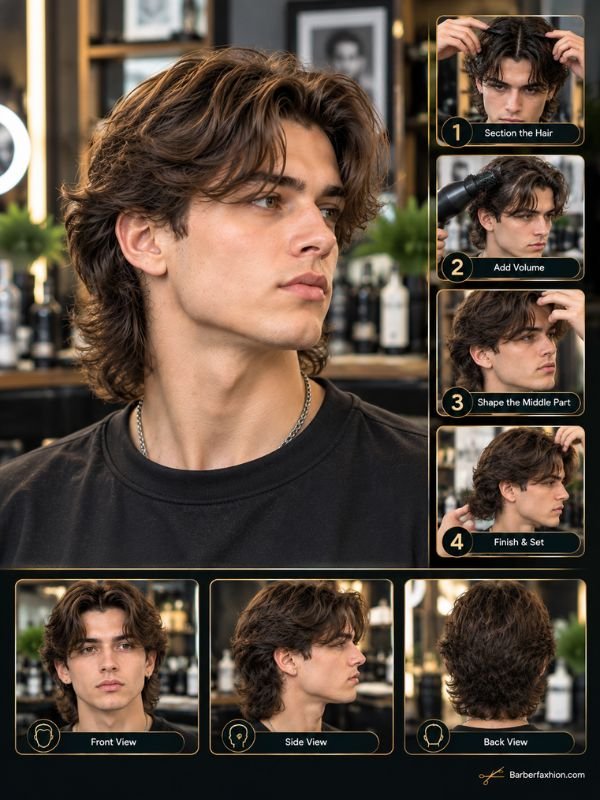
Styling doesn’t need to take forever. The basic goal is to establish the center part, direct the front sections, and give the longer back enough texture to move naturally.
Step 1: Create the Center Part
Start with damp hair and locate the natural center of your forehead. Use a comb to create a line from the front toward the crown.
Don’t force the part too far to one side. If your hair naturally separates slightly off-center, work with its growth pattern instead.
Step 2: Add Volume and Direction
Use a blow dryer to guide each front section away from the center. For more volume, lift the roots while drying.
Straight hair may need a little more work here. Wavy and curly hair often needs less manipulation.
Step 3: Shape the Front Sections
Allow the front pieces to fall toward the sides of the face. You can tuck them behind the ears for a cleaner appearance or leave them loose for a curtain effect.
The length should frame your face rather than constantly falling into your eyes.
Step 4: Add Texture to the Back
Use your fingers to separate the longer sections at the back. A small amount of matte paste, texture spray, or styling cream can help define the layers.
Avoid applying too much product. Heavy buildup can make a mullet look flat and greasy.
Step 5: Finish the Look
Check the haircut from the front, side, and back. The center part should look intentional, while the back should maintain its movement.
If everything looks too perfect, loosen the hair with your fingers. A little imperfection often makes this style look more natural.
Best Products for Styling a Middle Part Mullet
The right product depends on your hair type and desired finish.
For Straight and Fine Hair
Use lightweight mousse, volumizing spray, or a light texture product. These can add lift without weighing down the front sections.
For Wavy and Textured Hair
A styling cream or sea-salt spray can enhance natural movement. Use a small amount first and add more only if necessary.
For Curly Hair
Curl cream or a lightweight leave-in product can help define curls while keeping them flexible.
A diffuser can also help dry the hair without disturbing the curl pattern too much.
For a Messy or Matte Finish
Matte paste or lightweight clay can create separation through the front and back. Start with a small amount because it’s easier to add product than remove it.
What to Tell Your Barber
A good reference photo is useful, but don’t rely on the picture alone. Explain the shape you want.
How to Explain the Middle Part
Tell your barber that you want the top and front long enough to create a natural center part. Explain whether you want the front to reach the eyebrows, cheekbones, or farther down.
How to Request the Back Length
Be specific about how much length you want to keep at the back. If you want a subtle mullet, ask for moderate length. If you’re after a stronger silhouette, explain that you want the back noticeably longer.
How to Ask for Layers and Texture
Tell your barber whether you want soft layers, heavy texture, or a smoother finish.
For thick hair, mention where the weight feels excessive. For fine hair, ask to preserve enough density.
How to Choose Between a Taper and Fade
Bring a reference image showing the side profile. Say whether you want natural sides, a taper, low fade, or stronger fade.
Don’t simply say “make it modern” because different barbers can interpret that very differently.
Why You Should Bring a Reference Photo
A picture communicates proportions that can be difficult to describe verbally.
Ideally, bring front, side, and back examples if you want a very specific result. Then explain which parts of the reference you like.
Middle Part Mullet Maintenance and Grow-Out
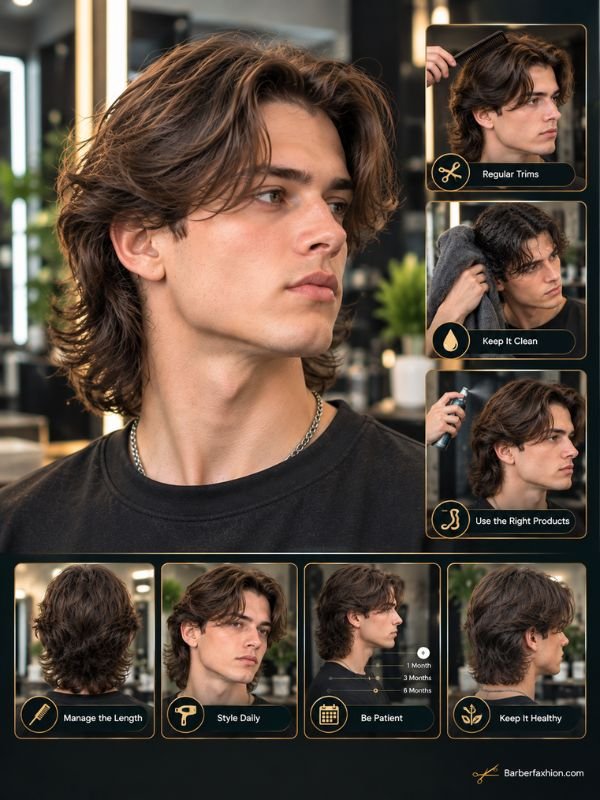
A mullet can become awkward during grow-out if the front, sides, and back aren’t kept balanced. Regular small adjustments are usually easier than allowing every section to grow unchecked.
How Often Should You Get It Trimmed?
The frequency depends on the style. A fade or taper requires more regular cleanup, while a shaggy no-fade version can usually tolerate more growth.
Even when you’re growing the back, occasional trims can help keep the shape intentional.
How to Keep the Center Part Looking Clean
Train the hair to separate naturally by creating the part while it’s damp and drying both sides in their intended direction.
If your hair has a strong cowlick, don’t fight it aggressively every morning. Ask your barber to work with the natural growth pattern.
Managing the Mullet During Grow-Out
Grow-out doesn’t mean ignoring the haircut completely. The sides, neckline, and front can still be shaped while you build length in the back.
Tell your barber that you’re growing the mullet so they don’t remove the length you’re trying to preserve.
Common Maintenance Mistakes
One common mistake is using too much product. Heavy styling products can flatten the center part and make the back look greasy.
Another is cutting the back too frequently because it feels long. The length is part of the haircut, so trimming it aggressively defeats the purpose.
Over-thinning thick hair can also cause problems as it grows. Controlled layering is usually more useful than randomly removing large amounts of density.
FAQs About Middle Part Mullet
Is a Middle Part Good for a Mullet?
Yes. A middle part gives the front a curtain-like frame while the longer back maintains the recognizable mullet silhouette. The result can be subtle or dramatic depending on the sides, layers, and length.
What Hair Type Is Best for a Middle Part Mullet?
Straight, wavy, and curly hair can all work with the style. The haircut simply needs to be adjusted for natural texture, density, and shrinkage.
How Long Does Your Hair Need to Be for a Middle Part Mullet?
You need enough length at the front for the hair to separate and fall toward both sides. Medium-length hair generally provides more styling flexibility, while shorter hair can create a more compact version.
Can You Get a Middle Part Mullet With Curly Hair?
Yes. Curly hair can create a highly textured version with plenty of natural volume. The cut should account for curl shrinkage and the direction of the curl pattern.
How Do You Ask a Barber for a Middle Part Mullet?
Explain that you want a center part with shorter or controlled sides and a longer, layered back. Also specify whether you want natural sides, a taper, or a fade, and show your barber a reference photo.
Conclusion
The middle part mullet brings together the face-framing effect of a center part with the length and movement of a mullet. That combination gives you plenty of room to personalize the haircut, whether you prefer a short and clean version, a long flowing shape, a Korean-inspired look, or something heavily textured.
Before your appointment, think about your natural hair texture, desired back length, side shape, and daily styling routine. Once those details are clear, your barber can build the cut around your hair instead of forcing your hair to behave like someone else’s.